Archive for the ‘Tutorial Release’ Category

Node event not only can be a link, but also can be JavaScript. Following are two samples.

A. Open a customer defined window

1. Create a node;
2. In Node Settings > General, choose “_self” in the Target box;3. In link box, input code as follows:
javascript:window.open(“http://www.sothink.com”,”_blank”,
“width=800,height=600,status=yes,toolbar=no,”)

B. Open a user-defined function window.

Note: It supports only Internet Explorer.

1. Add user-defined function into in web page like this:
2. In Node Settings > General, choose “_self” in the Target box;3. In Link box, input code as follows:
javascript:myaddFavorite()


Tree Menu can be controlled fully on webpage by interaction with mouse event. Click the text or image on page, you will see the tree menu expanding or collapsing its sub-menu. View the tree menu sample below to experience it:

Sothink Tree Menu

How to create JavaScript tree menu like this?

Steps to control the expanding or collapsing of the menu-tree in above sample:

1. Create an HTML page, and insert the tree menu into it.

2. Select the “Root” in the Tree panel, and then get the codes for expanding or collapsing the sub-tree from Global Settings > Advanced.

3.Insert the images and that refers expanding or collapsing the sub-tree. Then copy the codes which expand or collapse sub-tree and paste them to the web page as follows.

Four pieces of codes are inserted in this sample:

For expanding image:

<img src=”0609_f.gif” onClick=”stExpandSubTree(‘tree6575’,0,1);return false;>

For expanding text:

<a href=”#” onClick=”stExpandSubTree(‘tree6575’,0,1);return false;>expand all</a>

For collapsing image:

<img src=”0609_uf.gif” onClick=”stCollapseSubTree(‘tree6575’,0,1);return false;>

For collapsing text:

<a href=”#” onClick=”stCollapseSubTree(‘tree6575’,0,1);return false;>collapse all</a>

Note: Please input the above red codes manually, and make sure the function works well. The codes “return false” must be added into the <a></a> tag when the function “onclick” is called; if not, it causes the page refreshing in IE and Opera 9+ on Mac. And the codes can be copied from Tree Menu program except for the above-mentioned two parts.

Ok, click the image or text to experience.

When you surf the website, there are so many linked pages that needs to view, maybe tired or no enough time, you must close the tree menu page when finishing the partial nodes, and continue to fulfill the rest next time.

Still remember the last node that you clicked in previous time? Most of us maybe forget it, but the tree menu can impress that node and prompt the viewers. Now please re-open the tree menu page, there is node with white background in the tree menu. That is the last node you viewed in the previous time, you can continue the rest from here.

Check this tree menu samples to get it:

How to let the tree menu remember the state and recall for next time?

It is simple to get this function. Please check the option “Record the tree menu status and recall for next time” in Global Settings > Advanced. Just one click, your viewer can browse the pages with ease.

Download tree menu to create such a navigation menu.

There are three steps to update the menu which is created by the previous DHTML Menu versions.

Step 1: Open the pgt file

Open the pgt file which is created by the previous versions (supported versions: 3.0 and above versions ) in the latest Sothink DHTML Menu, and then click the Publish button, you can choose View/Copy Code to publish the menu.

Step 2: Update the menu’s code

Copy the header code and the body code of the menu, switch to the page which has the menu, and paste them so as to take the place of the original header code and the original body code.
Note: Replace and update the codes carefully because the stm31.js has changed into the stmenu.js since the version 6.x.

Step 3: Update the menu’s file

Click OK to copy resource files after updating the menu’s code.
For the menu, which has not set the JavaScript folder for resource files jet. Copy the resource files to the folder in which the menu page is. So, the resource files and the menu page are in the same folder.
For the menu, which has set the JavaScript folder for resource files. First of all, copy the resource file to temporary directory; and then, place the JavaScript file and image files into the corresponding JavaScript folder on the basis of resource folder.

Sothink DHTML Menu includes an advanced function, which enables you to generate a navigation page for your site by automatically analyzing the existing menu of a web site. The Generator wizard will scan all sub-items and their corresponding links, and create an “*.htm” file to show all the relation and structure of the website.

How to generate…

When you finish the menu configuration, click “Tools > Generate Site Map” to open the Site Map Dialog.
You can choose a theme from the pre-made theme list, or use an external style sheet by clicking the browse button. The result can be viewed in the Preview area.

After setting the style for your site map, you can choose one of following options as the content of your site map:

Items with links attached: Use the menu item’s text that is attached a link.
Items and links:  Use both item’s text and link URL.
Items only:  Use item’s text only.
Links only:  Only use the links of menu items as the content.

At last, click “Save” button to save the site map as an htm/ html file, or click “Print” button to print it.

View visual tutorial to get it >>

Download Sothink DHTML Menu to make navigation bar.

Apple’s iPad offers us better user experience, viewing websites is no more only one way, and the smart fluid width design can be landscape or portrait mode, which gives the visitors two completely different layouts of website. But now, the desktop computer is not compatible with iPad because of the different dimensions. For iPad web design, should we design two types of navigation tree menu for iPad websites? Of course you not, Sothink Tree Menu enables you to create the magic tree menu to match with iPad web page.

Navigation tree menu in iPad websites can quickly guide visitors to the target iPad web page, which is special used for iPad web design of large-scale directory. The collapsible tree menu is cross-browser, fast loading and SE friendly tree menu. And seamless integrations with HTML editors will enable you to add tree menu to iPad web page never so easy.

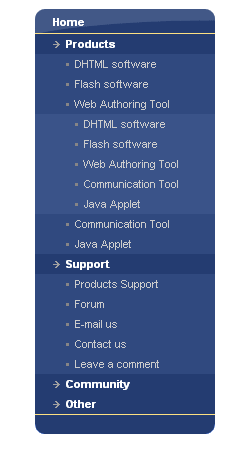
Using Sothink Tree Menu, let’s start building deep blue tree menu as below now:

  1. Start With Built-in Templates from Tree Menu Builder
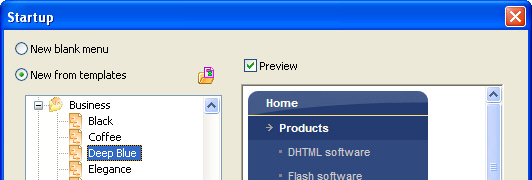
  2. Launch Sothink Tree Menu, template windows opens; and choose tree menu “Deep Blue” under the category “Business”.

    Create Tree Menu from Templates

  3. Modify the text and link for tree menu and apply it into your iPad websites
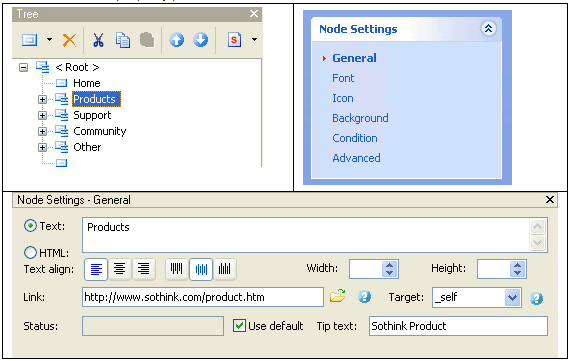
  4. Modify the text and link to make the tree menu server for your iPad websites. Click the text on Tree panel, select the option “Node Settings > General”, and edit the text and link in below property panel.

    Set Node for Tree Menu

  5. Set web path to make iPad tree menu work in local or Internet
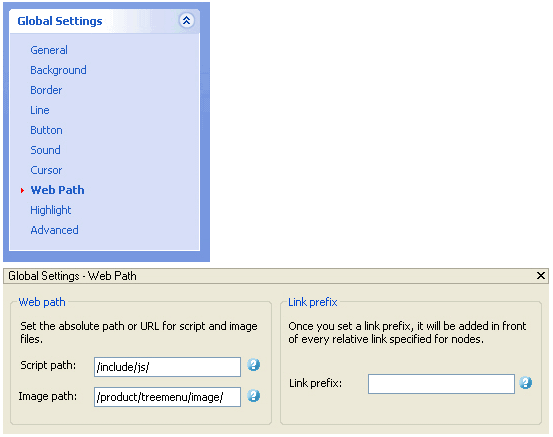
  6. Set web path to save JavaScript and image files to the defined directory, which makes sure the tree menu display correctly. You can enter the “Global Settings > Web Path” to set directory.

    iPad Tree Menu - Web Path

  7. Publish the iPad tree menu to make it display on iPad websites
  8. Publish the resource files, menu code or JavaScript menu code to the specific folder, and insert two pieces of code to the tag “head” and “body” within iPad web page. You can preview menu locally; upload all the resource files to web server, you can view tree menu on Internet.
    Check the button Publish Tree Menuon the toolbar to publish your iPad tree menu.

Finish the above steps; your tree menu has been displayed on the iPad websites. Is iPad tree menu perfectly displayed on iPad websites of the fluid design? Hope you like it.

Yes. Let’s take Arabic for example. To enable Arabic to show correctly, please set Arabic as the default language on your computer. If your OS is Win2000, set it in Regional Options>General>Language settings for the system.
If your OS is XP, open Control Panel, go to “Regional and Language Options”, and in Advanced tab, please select “arabic” for “Language for non-Unicode programs”. If there is no option of “arabic”, please go back to Language tab, check “Install files for complex script and right-to-left languages (including Thai);
If your OS is Vista, open Control Panel, go to “Regional and Language Options”, and in Formats?Location?Administrative tab, please select “arabic” for “Language for non-Unicode programs”. If there is no option of “arabic”, please go back to Keyboards and Languages tab, check “Install/uninstall languages…”.

View Arabic DHTML Menu here >>

Menu can work in a JavaScript disabled browser. You can insert the codes which are generated by Search Engine Friendly Code Maker to HTML page, and the codes will behave like site map in the web page if the js files are disabled in the browser. The codes are inserted into the BODY tag, which is behind the menu code. If the js files are accessible in the browser, the menu can be shown in the web page, but the codes will not shown; If the js files are disabled in the browser, the codes will be shown as site map in the web page to navigate your web site.

Site root is very important step in navigation menu creation, if setting site root wrongly, maybe you will meet problems below:

  • Navigation menu works well locally, but it won’t be shown on internet;
  • Navigation menu is inserted many pages saved in different directories, the menu maybe not show correctly on all web pages.

In order to avoid these problems, you need to set resource folder to save js and images to the defined folder, which makes sure the navigation menu can be shown on every page locally and Internet.

What’s Site Root?

Site Root is the root directory of your remote web server on your local driver.

How to set Site Root?

Very important: Make sure the folder structure is the same between your local computer and remote server.

If
your web site is http://www.sitename.com/subfolder/,
your web pages are stored to D:\foldername\sitename.com\subfolder on local computer

While
http://www.sitename.com/ is the root of your web site,
it corresponds to D:\foldername\sitename.com on your local computer.
So you should set D:\foldername\sitename.com as Site Root.

From the example above mention, we know that Site Root refers to the corresponding local folder to the root of your web site. Thus, no matter what your web site address is, you should first find the root of your site, which must be like this http://www.sitename.com, and then set its corresponding local folder as Site Root.

Generally, we will save js and image files to different folders:
If
You save js files to D:\foldername\sitename.com\js
And save image files to D:\foldername\sitename.com\images
So you should set \js and \images as Resource Folder.

The figure like this:

How to set Web Path?

If the web address on your test local server is http:///www.testserver.com/subfolder, but the web address on your remote server is http://www.sitename.com, that is, your test local server and your remote server do not have the same directory to store your files, the Site Root can only work in one server, not both.

if,
your files are stored at D:\foldername\yourwebsite\subfolder on local computer,
for test server, Site Root corresponds to D:\foldername\yourwebsite locally,
while for remote server, Site Root corresponds to D:\foldername\yourwebsite\subfolder locally.

To solve the problem, you can set Web Path instead of Site Root, like
JavaScript Path: http://www.sitename.com/js/
Images Path: http://www.sitename.com/images/

The figure like this:

Then be sure to upload all the resource files to the relevant folders on your remote server, and your menu could be previewed not only on the test local server, but also the remote server.

Publishing navigation menu is the process which inserts your pre-designed menu to web pages, which makes it become web menu and shows on website. Basically, you need do two jobs when publishing menu:
• Insert two pieces of menu code to the corresponding HTML tag;
• Copy the resource files (image and js files) to the related directories.

You can preview navigation menu in web page locally when two jobs are done; after uploading all the files to web server, the navigation menu will be shown on Internet.
Sothink DHTML Menu introduces three methods to publish navigation menu based on menu applied range, and we will recommend the best menu publishing method for you. Let’s view these methods:

Publish JS… (Sign with red, recommend to publish menu to many web pages)

Benefits:

Generally, web designer will apply one menu to almost all web pages, which makes the website seem uniform. Using this method, you just update one js file to modify menus on the all pages, which wastes no time to change menu code page by page; comparison to other two methods, the HTML code of web page will be reduced greatly, which is better to speed up page display.

Steps:

1. Check “Publish JS…” option and open “Publish JS” window.
2. Set directory to save the generated js file.
3. Click “Copy All” button to copy first menu code, and insert these code to Head tag of HTML page; once again to copy and paste the second menu code to Body tag of HTML page.
4. Select “Copy the resource files” option to copy JavaScript and image files, and paste them to the defined folder automatically.
5. Click “OK” to quit the window and finish the settings.

Note: The menu code like “file:///E|/dmenu2010” is set on “Global > Resource Folder”. To make navigation menu show correctly on web pages which are in different directories, you should set resource folder for navigation menu.

Publish… (Sign with yellow, recommend to publish menu to few pages)

Benefits:

Few pages need to be inserted navigation menu, you can use this method to publish menu. Without opening HTML pages, Sothink DHTML Menu enables you to copy and paste the menu code to Head and Body tag of HTML page directly, and the resource files which are included in this menu will be copied to the defined folder automatically.

Steps:

1. Check “Publish…” option and open “Publish” window.
2. Choose page directory where the menu will be inserted. The HTML code of this page will be listed in field below.
3. Put the cursor in proper position where the menu will be inserted, and click “Insert Code” button to insert Head and Body code automatically.
4. Select “Copy the resource files” option to copy JavaScript and image files, and paste them to the defined folder automatically.
5. Click “OK” to quit the window and finish the settings.

Note: The menu code like “file:///E|/dmenu2010” is set on “Global > Resource Folder”. To make navigation menu show correctly on web pages which are in different directories, you should set resource folder for navigation menu. If you haven’t set resource folder, the resource files will be copied to the folder where the web page is saved.

View/Copy Code… (Sign with blue, publish menu manually)

Benefits:

If being familiar with menu code, you can use this method to publish menu. No need to re-generate menu code by program, you can manually modify the menu property, change resource folder, or update text and link for each item directly in HTML code.

Steps:

1. Check “View/Copy Code…” option and open “View/Copy Code” window.
2. Click “Copy All” button to copy the first menu code, and insert these code to Head tag of HTML page; once again to copy and paste the second menu code to Body tag of HTML page.
3. Select “Copy the resource files” option to copy JavaScript and image files, and paste them to the defined folder automatically.
4. Click “OK” to quit the window.

Note: The menu code like “file:///E|/dmenu2010” is set on “Global > Resource Folder”. To make navigation menu show correctly on web pages which are in different directories, you should set resource folder for navigation menu.

Depending on the menu page quantity and menu code skill you master, you can choose the suitable method from above-mentioned publishing methods to publish your menu. Download Sothink DHTML Menu to publish navigation menu to web page by yourself.