Archive for the ‘Tutorial Release’ Category

It is time to design new style for your website. With festival arrival, special day coming, website designers will work out new style to dress up the existing website. When web has been changed its style to new one, it is obviously outdated if navigation menu still keeps unchangeable.  For website that needs to transform frequently, you should solve the problem about how to build navigation menu to match with versatile website styles. To get perfect visual effect between website and navigation, you need to edit two elements in navigation menu, background image or color. Let’s see how Sothink DHTML Menu create navigation menu:

Step 1: Add Menu Items to scheme structure for navigation menu

Launch Sothink DHTML Menu, you can add menu item on the left panel. First, check one menu item; and then, choose the button to add the same-level menu items or sub-level menu items; final, click once to add one menu item, and click more add more.

navigation menu builderStep 2: Apply menu style from templates to navigation menu

After menu structure is done, you can edit the menu item, including text, link, and font. To quick Apply the menu style from template, you can choose “Template > Apply template to menu” command to apply template style to your navigation menu.

drop down menuStep 2: Publish navigation menu to website

Menu creation is finished. Click the button “Publish” to choose the best publishing method. After the option is check, you can follow the step to publish your navigation to website. And upload all the resources for navigation menu.

navigation menu

Step1. Follow the visual tutorial.

http://www.sothink.com/tutorials/how-to-create-dynamic-tree-menu-with-created-recordset-from-dreamweaver.htm

Step2.

Launch Sothink Tree Menu. Create a new menu item and Input ”

<%=sCatName%>

” in it.

Enter “Node Setting > Condition” and input the following codes in Prefix:
/*
<%
While Not Recordset1.EOF
sCatName=Recordset1.Fields.Item(“NAME”).Value
%>
*/

Then input the following codes in Suffix:

/*
<%
RecordSet1.MoveNext
Wend
%>
*/

Step3.

Create a sub item for this menu item, then input ”

<%=sProduct%>

” in it and input

<%=sLink%>

in link field.

Enter “Node Setting > Condition” and input the following codes in Prefix:
/*
<%
Recordset2.Filter = “CATID=” & Recordset1.Fields.Item(“ID”).Value
While Not RecordSet2.EOF
sProduct=Recordset2.Fields.Item(“NAME”).Value
sLink=Recordset2.Fields.Item(“LINK”).Value
%>
*/

Then input the following codes in Suffix:
/*
<%
RecordSet2.MoveNext
Wend
%>

*/
Step4.

Enter “Global Setting > Web Path” to set the webpath as below:

Script path:

http;//localhost/js

Image path:

http;//localhost/image
Step5.

Publish the menu to the ASP page we have just created in step1.

Now you have successfully use the created recordset from DW with Tree Menu.

Black menu symbolizes fashion, business, reliance, which is widely used for the various website, such as commerce, government and education. Black menu is easy to match with website color which ranges from light to dark, the classic color scheme includes black & white, red & black and black & blue. Black menu is plain and high capacity to contain almost all URL links to reach the target page quickly.

black-menu

How to Create Black Menu?

With Sothink DHTML Menu, you can choose the proper one from 2 methods to get your wanted black menu.

We will take this menu for example to learn setting black menu:

Navigation Menu

Method One: Insert image of black background as background for the whole menu.

The black menu created by this method will be like this:

Navigation Menu - Black Menu

  1. Check “Top-Level-Menu” in the menu panel, and enter “Popup menu > Background” to choose black image as background for the whole menu.

    Black Menu - Popup Menu

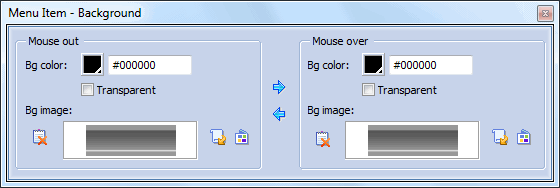
  2. Check all menu items, and enter “Menu Item > Background” to set background color as “Transparent”.

    Black Menu - Menu Item

Method Two: Set black background image or background color to every menu item

The black menu created by this method will be like this:

Navigation Menu - Black Menu

  1. Check all menu items, and enter “Menu Item > Background” to set background color as “black” or insert black image as background image.

    Black Menu - Menu Item

  2. Check “Top-Level-Menu” and enter “Menu Item > Border” to set border as 0; check the popup menu and enter “Popup Menu > Border” to set border as 0; and check menu items and enter “Menu Item > Border” to set border as 0.

Tab menu has the features of space-saving and eye-catching, which is the popular web menu applied to website navigation. Generally, tab menu is 2-level navigation menu, it displays main menu as tabs, and sub-menu will be shown vertically in below line when the mouse is over the main menu. Tab menu usually uses round corner as background, which makes the web menu appealing and pleasing.

Tab Menu

How to Create a Tab Menu?

Tab Menu is a standard compliant 2 level tab menu. With Sothink DHTML menu, you can create a tab menu in steps:

1. Create menu includes sub-menu.2. Enter Global > Menu Type in Tasks panel and select the option “Tab menu”. The menu is switch to a menu with 2 levels.

3. Enter Global > General in Tasks panel, choose “Mouse over” as the method to select the item. So you can move you mouse over one of the sub items to select it.

4. Check “Top-Level-Menu” and enter “Menu Item > Border” to set border as 0; check the popup menu and enter “Popup Menu > Border” to set border as 0 and delete the arrow from “Popup Menu > Arrow”.

5. Select all menu items, enter “Menu Item > Background” to pick up the background image from image library.

6. Set “Transparent” for all menu items, popup menu and the whole menu in “Popup Menu > Background” and “Menu Item > Background”.

At present, website designers can complete the various navigation menus by different technologies, like CSS menu, JavaScript Menu, Flash menu, HTML menu and jQuery menu. Then, which is the popular way to create navigation bar? The website guru prefers to design web menu by JS and CSS code; but for majority of us, we’d like to make navigation menu by professional menu creator. Here lists three reasons why choose menu creator:

We will take Sothink DHTML Menu for example to explain advantages about menu creator.

WYSWYG Menu Creator Makes Menu Creation Simple

  1. Get a clear menu structure from menu panel; and freely adjust the position for menu item by clicking.menu-creator-panel
  2. Preview JavaScript menu in real time with menu creator.
    menu creator
  3. Choose menu properties and customize the corresponding menu style in menu creator.menu-creator-property

Finish Functional Menus in Easy Way

  1. Set menu type as Float to float menu in fixed position on webpage.float-menu
  2. Edit highlight settings for highlight menu to show where the user is on the web site.Menu Creator - Highlight Menu
  3. Make long menu items scroll and keep their scrolling in a fixed depth.Menu Creator - Scrolling Menu

Quick Start Menu from Rich Resources

  1. Start web menu from the various free menu templates.menu-creator-template
  2. Apply preset menu style to the menu item.
  3. Apply resources from image library to design menu in less time.

The above-mentioned features are only in menu creator; download Sothink DHTML Menu to get more features which other technologies are unable to achieve.

JavaScript tree menu will be the best guide for website of a complicated directory structure. You can see such navigation tree menus on many large-scale websites, such as shopping and knowledge website. This type of tree menu has the features of clear navigation, unlimited level of tree menu, smart recording function and SE-friendly; that is the reason why tree menu becomes popular.

Now, you have decided to insert menu tree into webpage to navigate your website. Next, let’s think about how to make tree menu quickly? Create a navigation bar by CSS or HTML code? No, Sothink Tree Menu will be the ideal tree menu builder to create JavaScript tree menu because there is no coding and professional skills needed.

Build the professional menu tree as below in 3 steps:

tree menu samples

Step 1: Start tree menu from free built-in templates.

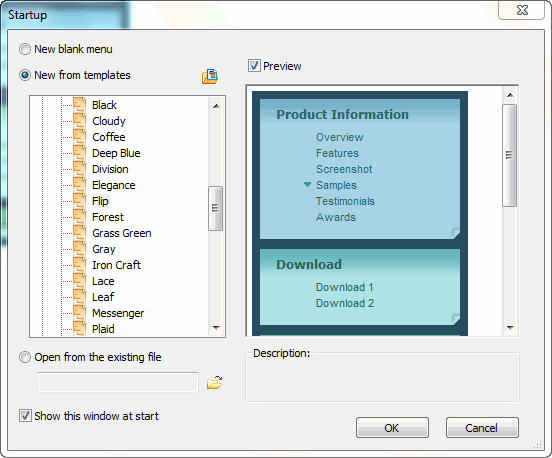
Launch Sothink Tree Menu, choose “Business > Flip” from Startup window.

JavaScript Tree Menu - Menu Templates

Step 2: Set properties for each menu items

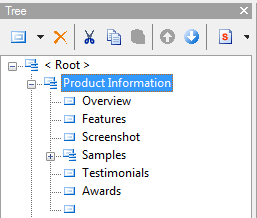
  • Choose menu item in Tree panel;

    JavaScript Tree Menu - Tree Panel

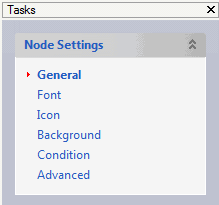
  • Enter Tasks panel to choose required items;

    JavaScript Tree Menu - Tasks Panel

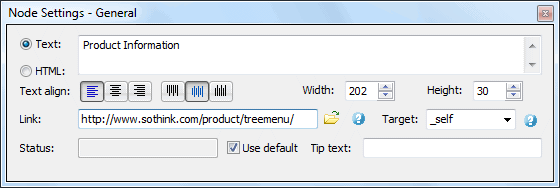
  • Set properties for the selected menu item in properties panel, such as text content modification, link, and item size.

    JavaScript Tree Menu - Property Panel

Step 3: Publish menu tree to webpage

  • Check “Publish” button on the toolbar to publish your tree menu.

    JavaScript Tree Menu - Publish Button

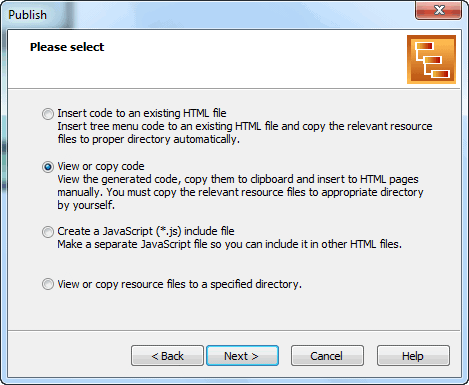
  • Choose right publish method to insert web menu to webpage step by step.

    JavaScript Tree Menu - Publish Wizard

User-friendly navigation tree menu is one of the most important aspects of web site design, and also one of the most challenging. Using navigation tree builder, any novice web developer can put together a 100-page web site, but organizing those 100 pages into easily-navigable as if seasoned designers.

Web designers have no shortage of choices when it comes to choosing a navigation tree for a site. For example, floating JavaScript menu, highlight menu tree, accordion menus, and a number of other creative solutions can be found. With Sothink Tree Menu, web designers can build navigation tree menus from free menu templates & image library, and customize menu tree style as you like. The various menu templates can significantly reduce the time spent on making a navigation tree for a Web site, and also give the designer a choice of many different options so that to choose the one most appropriate for the requirements at hand.

Besides above general navigation tree menus, Sothink Tree Menu can create a special navigation tree menu, which enables to hide some nodes from showing up in the navigation tree. There are two reasons why need such navigation tree on webpage:

1. Insert the same navigation tree menu for the whole website, but display different menu contents for the various pages.
2. Reserve or restore the node for special purposes, such as product promotion, festival special.

The below navigation tree menu will get you a clear cognition.

navigation-treeHow to create navigation tree that some nodes are disabled?

It is easy to make such a disable node navigation tree menu if you are using Sothink Tree Menu to edit menu tree. In this menu tree builder, just pick up the nodes that need to be disabled, and enter the tasks panel to click “Advanced” option, and check “Disable node(s)” on below properties panel.

tree menu settings
In the program, you will get navigation bar like this:

Sothink Tree Menu

Whenever you can restore the navigation tree menu only uncheck the “Disable node(s)”. The disable nodes are visible in authoring file; it won’t be displayed on browser.

The initial vertical position of a floating menu is often lower on the page than it needs to be when the page is scrolled. On this site, for example, the initial “Y” coordinate is 140 pixels below the top of the page in order to leave room for the page header. However, as the page is scrolled, the menu would look funny if it were a third of the way down the page, so, when the page is scrolled, the menu is only 10 pixels below the top of the page.

Here is how to change the initial “Y” coordinate from 140 pixels to 10 pixels when the page is scrolled:

1. Select the first menu item in the Menu Tree (the item just below <Top-level Menu>) and select Condition under Menu Item Settings.

2. Enter the following code in the Prefix window:

var myitem=

3. Enter the following code in the Suffix window:

myitem.oParMenu.iY=”Math.max(140,stgct()+10)”

In the code you enter in the Suffix window, be sure to change “140” to the initial Y coordinate of your floating menu.

The tutorial is from the warm-hearted DHTML Menu users

In order to create a DHTML Menu with a transparent background, there are three places where the background must be set to transparent:

1) Select (highlight) <Top-level Menu> in the menu tree, go to Popup Menu – Background, and check Transparent.

2) Select (highlight) all menu items (Edit > Select > All Items), go to Menu Item – Background, and check Transparent for both Mouse out and Mouse over.

3) With all menu items still selected, go to Popup Menu – Background, and check Transparent.

Here is a sample menu with a transparent background:

This is not a tutorial site. Sothink has an an extensive DHTML Menu Tutorial Center with tutorials on getting started and more advanced subjects. Also, the DHTML Menu program has a Help section. The suggestions we offer here are based on our use of DHTML menu They work for us, and they might work for you, too. Before we start with the step-by-step instructions, here are three recommendations that we feel are important:
•    Use DHTML menu as a standalone program. If you use Adobe GoLive, Dreamweaver, Expression Web, or FrontPage you may be tempted to integrate DHTML menu with your Web authoring software using one of the plug-ins supplied with DHTML menu. Do not succumb to the temptation; if you do, you are making more work for yourself and asking for trouble.
•    Do not include menu code in your pages. Always generate a JavaScript include file. There are many advantages to having your menu in an external JavaScript file, but perhaps the most important advantage is that you only have to edit and upload a single file whenever your menu changes.

Read on »